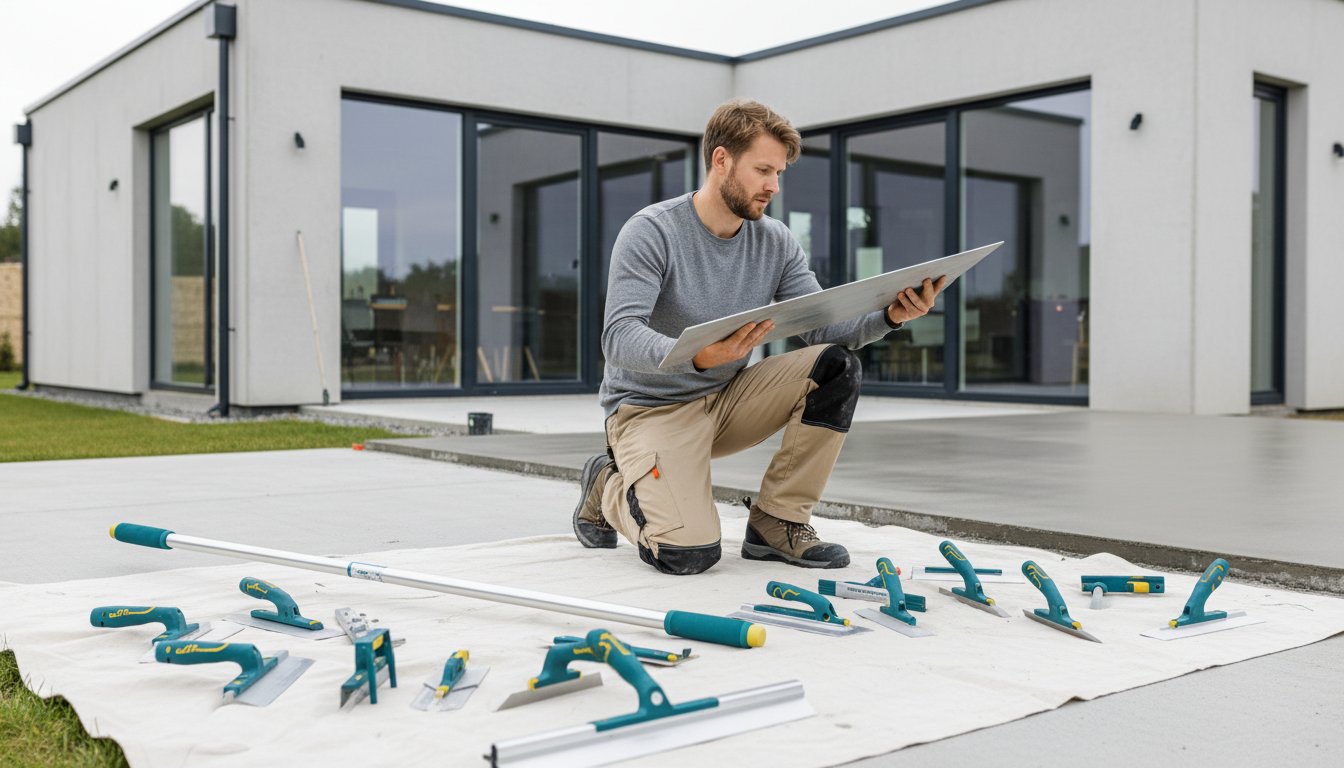
Concrete Finishing Tools: A Practical Guide for Your Next Project
March 22, 2026
Published by Life4Rent · Operated by Brohf Software OÜ
Last Tuesday, a homeowner in Budapest watched 6 cubic meters of wet concrete fill his patio forms while he held nothing but a garden rake and a warped piece of timber. He quickly learned that the material sets in under 60 minutes on a warm day, leaving no room for hesitation. The clock doesn't stop. Professional concrete finishing tools are the only way to ensure your driveway doesn't end up with permanent ridges or low spots.
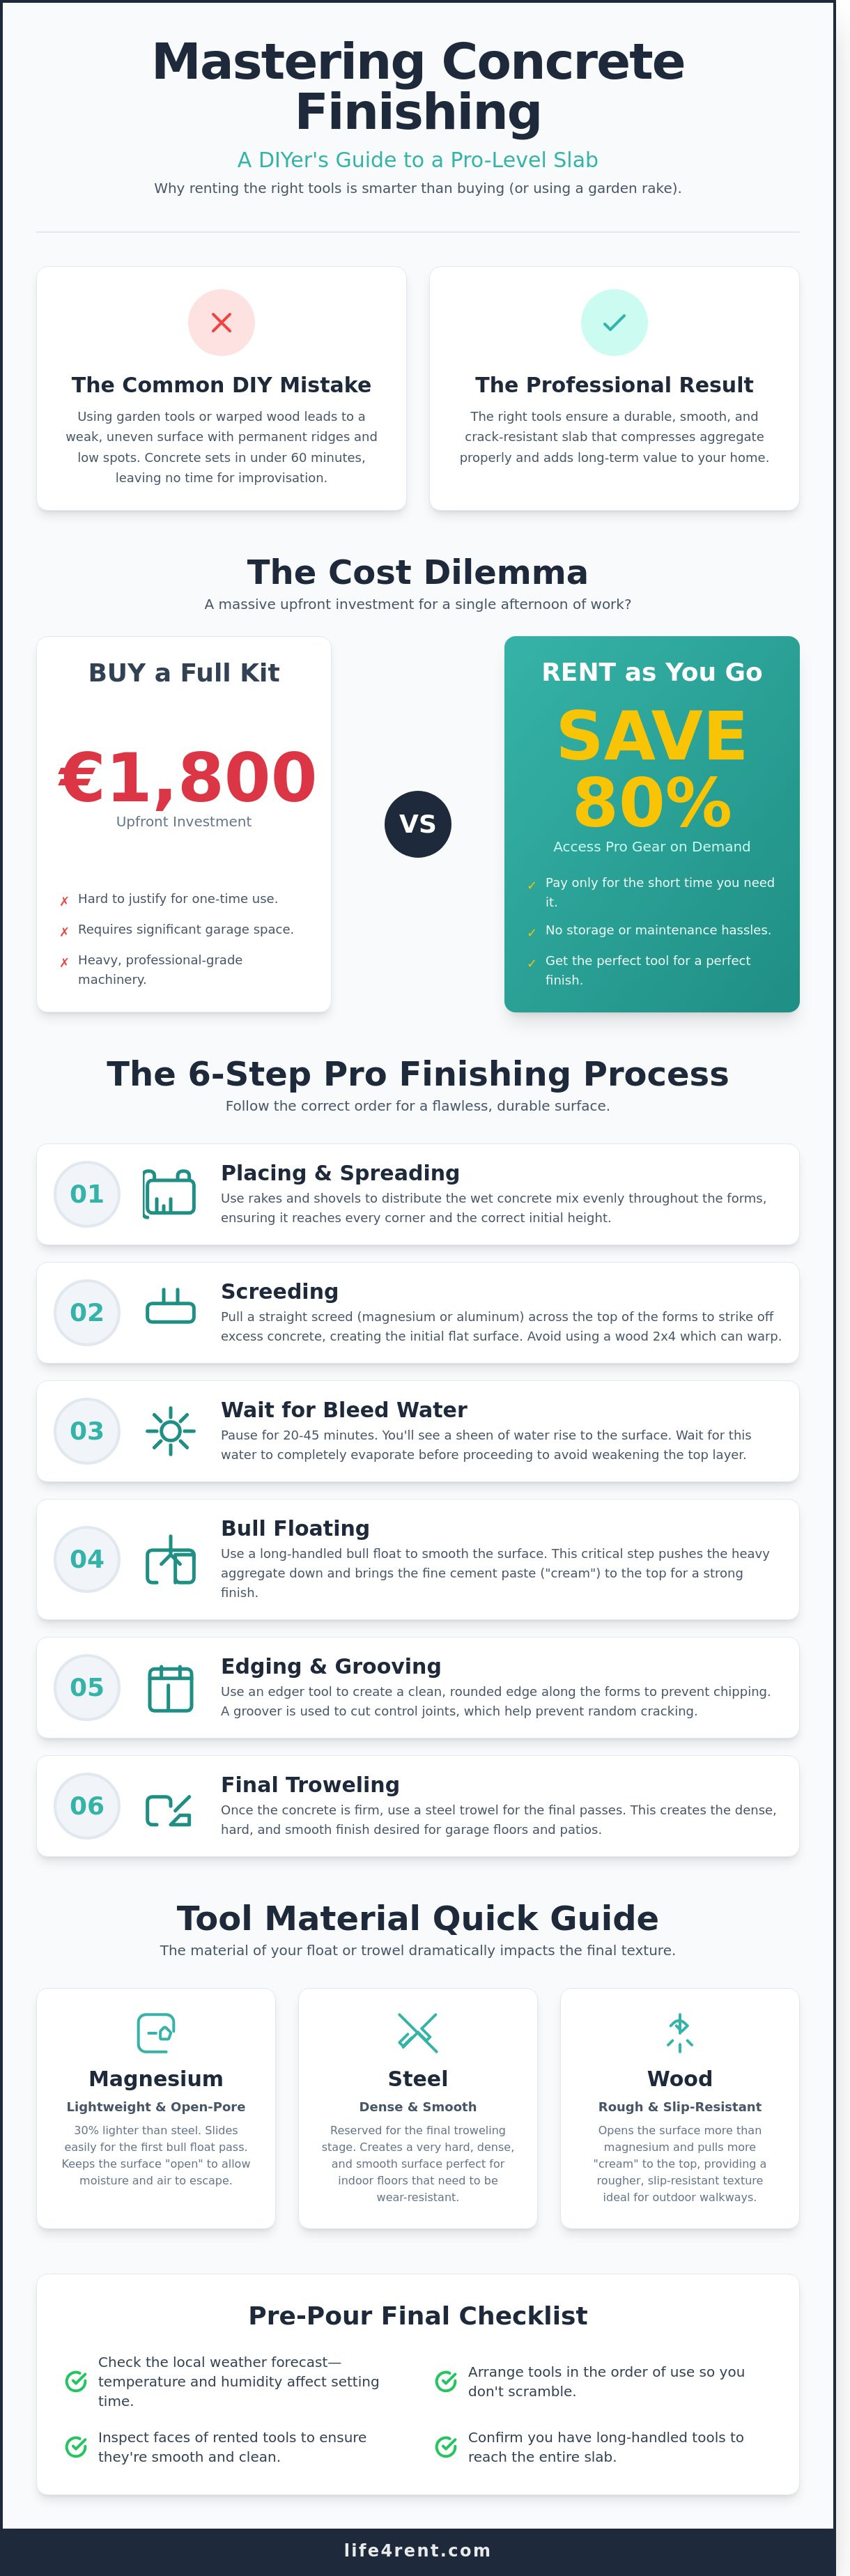
You probably agree that buying a full kit for 1,800 Euros is hard to justify for one afternoon of work. It's frustrating to choose between a sub-par finish and a massive upfront investment in heavy machinery. You want the quality of a hired crew without the steep price tag of owning every piece of gear.
You'll discover how to access professional gear through peer-to-peer rentals to save up to 80% on equipment costs. We'll explain when to use a magnesium float versus a wooden one and provide a checklist for the moment the delivery truck pulls up. This guide ensures you have the right gear to create a durable, smooth surface that adds value to your home.
What are concrete finishing tools and why do they matter?
Concrete finishing tools are the specific instruments used to shape, level, and seal a slab after the initial pour. This process isn't just about making the ground look good. It's about structural integrity and long-term durability. You'll use these tools to manipulate the "cream," which is the fine cement paste that rises to the top during the work. This paste creates the wear-resistant surface that determines how long your driveway, garage floor, or patio will last.
Most DIY enthusiasts think the job ends when the wet mix is inside the forms. That's a mistake that leads to dusty, crumbling surfaces. Without the right mechanical leverage, you won't be able to compress the aggregate properly or bring enough paste to the surface. You'll need a variety of gear, ranging from 48-inch bull floats for large areas to 6-inch hand edgers for the corners. Each piece plays a role in preventing cracks and ensuring a flat, professional finish.
To better understand these concepts and see the equipment in action, watch this helpful video:
The difference between placing and finishing
The tasks of placing and finishing are two distinct phases of any concrete project. You'll use rakes and shovels during the placing phase to move the wet mix into every corner of your forms. This stage is purely about volume, distribution, and getting the mix to the correct height. It requires physical strength but less finesse than what comes next.
The finishing stage is a more delicate operation that begins once the concrete is level and the bleed water starts to rise. Bleed water usually appears within 20 to 45 minutes after the pour. You must wait for this water to evaporate before you continue with your concrete finishing tools. If you work the surface while water is still present, you'll weaken the top layer and cause scaling. Each tool corresponds to a specific stage in the chemical hardening process, from the initial bull float pass to the final trowel.
Common materials for finishing tools
The material of your tool significantly impacts the texture and breathability of the slab. Magnesium tools are the industry standard for the first pass. They are about 30% lighter than steel, which reduces fatigue when you're working on a large project. A magnesium float keeps the surface "open," allowing air and moisture to escape during the curing process.
- Magnesium floats: These slide easily and are best for the first pass to level the ridges left by the screed.
- Steel trowels: These are reserved for the final stage to create a dense, hard, and smooth finish.
- Wood floats: Often made from teak or redwood, these provide a rougher, slip-resistant texture ideal for outdoor walkways.
When you're looking for concrete finishing tools, pay attention to the handle length and the material's purpose. For massive industrial floors or large residential slabs, contractors often use a Power trowel to achieve a level finish that hand tools can't match. You'll struggle to get a durable surface if you don't use the right tools for leverage. A 4-foot bull float on a 12-foot extension handle allows you to level a large area without stepping into the wet mix, which is vital for maintaining a consistent 3,000 PSI strength across the entire slab.
Essential hand tools for a smooth surface
You'll find that the first few minutes after the pour are the most critical for your project. This is when the heavy lifting of leveling begins, and your selection of concrete finishing tools dictates the final quality. You need a screed first. It's usually a long, straight magnesium or aluminum bar. You pull it across the wet concrete to strike off the excess material and get the slab to the correct height. While some DIYers use a straight 2x4 piece of lumber, a professional rental screed stays straight and won't warp from moisture. It saves you from having a wavy patio later on.
Once you've cleared the excess, the bull float comes into play. These tools have long handles, often extending up to 12 or 16 feet, so you can reach the center of a large slab without stepping in it. You push the float away with the front edge slightly lifted and pull it back with the back edge lifted. This process pushes down the large rocks, known as aggregate, and brings the cement paste to the top. According to the American Society of Concrete Contractors, using the right essential concrete finishing tools and equipment ensures the surface remains level before it begins to set.
Hand floats and darbies
Darbies are essentially longer versions of hand floats. You'll use a darby immediately after screeding if you're working on a smaller area where a bull float won't fit. It helps flatten the surface by hand. Most darbies are about 30 to 45 inches long. They provide a more tactile feel for the concrete's consistency than a long-handled tool does.
Hand floats take over when the concrete has bled its excess water. You'll need these for the corners and edges where the larger tools can't reach. Magnesium floats are the standard choice because they slide easily over the surface. If you're working on a driveway or a shed base, these tools help remove any small ridges the bull float left behind. You can check out available concrete tools for rent on the platform to see what local owners have in their kits.
The role of edgers and groovers
Sharp, 90-degree edges on a slab are a liability. They tend to chip and break when you drive a car over them or even when you hit them with a lawnmower. An edger has a curved lip that creates a rounded perimeter. This makes the edge much stronger and more resistant to wear. You'll want to run the edger along the forms several times as the concrete hardens to get a crisp, clean look.
Groovers, or jointers, are just as vital for the longevity of your project. Concrete shrinks as it dries, which leads to internal stress. If you don't provide a place for that stress to release, the slab will crack randomly. A groover cuts a deep line into the wet concrete, creating a control joint. This ensures that when the slab inevitably cracks, it happens at the bottom of the groove where nobody sees it.
For a standard 4-inch thick slab, your control joints should be at least 1 inch deep to be effective. Most experienced contractors place these joints every 8 to 12 feet to manage the tension properly. The right kit for your project depends on the size of the pour. A 10x10 foot patio requires different reach than a 50-foot sidewalk.
Most rental listings will specify the handle length and float width. Magnesium tools are usually lighter and better for beginners than heavy steel versions. If you're unsure about the weight, ask the owner for the specific dimensions before you book. This ensures you don't end up with a tool that is too heavy to manage during a long pour.
Renting vs. buying construction equipment
A professional-grade bull float often requires an upfront investment of €160 or more. You'll likely only use this specific item for about 15 to 20 minutes during a standard driveway pour before the concrete begins to set. It sits in a corner for the rest of the year, gathering dust. This math doesn't make sense for a DIY enthusiast or a homeowner tackling a one-time garden renovation. Most of the budget should go toward the materials themselves rather than hardware that depreciates the moment it leaves the store. You're better off spending that extra cash on a higher grade of concrete mix.
Concrete finishing tools demand immediate attention the moment the work ends. Wet cement hardens into a rock-like substance within 30 to 60 minutes, depending on the ambient temperature and humidity. If you don't scrub every inch of the magnesium blade and the swivel head immediately, the tool is effectively ruined for future use. Many casual users realize too late that they've spent €200 on equipment that's now a heavy piece of scrap metal. Ownership carries a hidden tax of labor and stress that most people overlook. Rental tools are maintained by people who understand these requirements.
Life4Rent provides a middle ground by connecting you with neighbors who already own this specialized gear. You get the high-end results of professional equipment without the long-term burden of ownership. It's a practical way to keep your project costs under control while ensuring the finish looks like a pro did it. You pay for the utility of the tool, not its permanent residence in your home.
Cost benefits of local rentals
Local neighbors often list their concrete finishing tools at rates that typically sit 20% to 30% lower than traditional big-box hire shops in major European cities. These peer-to-peer listings also eliminate the need for a van or a large trailer. If a neighbor three streets away has the kit, you can pick it up in five minutes with a standard car. One-off projects like a 25-square-meter patio don't justify a €500 tool budget. A €40 rental fee is much easier to justify for a weekend project.
Storage and maintenance realities
Large floats come with handles that often extend up to 5 or 6 meters in total length. Standard garages in European suburbs rarely have the wall space to store these items safely without them becoming a trip hazard. Owners on Life4Rent take pride in their equipment, so you'll usually receive gear that's clean and ready to work. You won't have to worry about rust or the degradation of moving parts over several years of disuse. The responsibility for long-term upkeep stays with the owner, not you.
Consider these physical realities before you commit to a purchase:
- Long-handled tools require at least 2 meters of vertical or horizontal clearance for safe storage.
- Magnesium and aluminum surfaces pit easily if you store them in damp conditions.
- Pivot mechanisms need regular lubrication with specific oils to prevent seizing.
- Handles that measure 3 meters are nearly impossible to fit in a sedan without specialized racks.
Preparing for your pour and finish
You need a clear plan before the concrete truck pulls up to your driveway. Check the local forecast at least 24 hours in advance. Concrete cures best when temperatures stay between 10°C and 27°C. If the humidity drops below 40% or wind speeds exceed 15 km/h, the surface might dry too fast. This leads to plastic shrinkage cracks that ruin the look of your slab. High humidity above 80% will significantly slow your drying time.
Layout your concrete finishing tools in the exact order you'll use them. You'll start with the screed, move to the bull float, and then finish with hand tools like edgers and groovers. Keep everything within arm's reach; this prevents panic when the mix starts to set. Once the concrete hits the ground, you usually have about 30 to 60 minutes of working time depending on the ambient heat. If you're working alone, keep the area small to ensure you can reach every corner before it hardens.
The importance of the slump test
A slump test measures how much the concrete falls when you remove a cone-shaped mold. Most residential driveways or patios require a slump between 100mm and 125mm. If the mix is too wet, it's easy to spread but loses about 25% of its potential strength. Stiff concrete lasts longer but requires significant physical force to level. You'll need to apply more pressure with your concrete finishing tools if the mix feels gritty or stubborn during the initial pass.
Watch the truck driver as they add water to the drum. Ask for a specific slump rather than just saying you want it "wet." Every liter of extra water added to a cubic meter of concrete can reduce the final durability. If the mix arrives too dry, add water in small increments of 5 to 10 liters. This ensures you don't overshoot the consistency and end up with a soupy mess that won't hold its shape.
Timing the final trowel pass
You must wait for the bleed water to vanish before the final stages. This water rises to the top as the heavy aggregates settle into the slab. If you trowel this water back into the surface, you'll end up with a weak top layer that flakes off within two years. This phenomenon is known as scaling. Patience is vital here because the evaporation process can take anywhere from 20 minutes to two hours depending on the sun exposure.
Test the surface by stepping on it with your work boots. If your boot sinks more than 6mm, the concrete is still too soft for finishing. Wait until you leave only a 3mm to 5mm impression. Steel trowels should only touch the concrete when it's firm enough that you can't easily push your thumb into the surface. At this stage, the tool should produce a slight ringing sound as it slides across the slab. This indicates the surface is closing up and becoming dense.
Find the right equipment for your next project by browsing the available tool listings on our platform.
Finding reliable tools on the Life4Rent marketplace
You can start your search by typing 'concrete tools' or 'bull float' into the search bar to see what's available in your local area. You should focus on listings within a 15-kilometer radius to minimize travel time on the morning of your project. High-quality photos are the most important part of any listing. You'll want to zoom in on the images to ensure the tool faces are smooth, flat, and free of any dried concrete crust. A bull float with a pitted or scratched surface will leave visible streaks on your wet slab that are difficult to fix later.
Owners on Life4Rent often group items together into convenient packages. These kits might include a bull float, a magnesium hand float, and an edger in one single listing. You can often save 20% to 30% on the total price by opting for these bundles instead of renting each piece separately. Check the description for mentions of a "walking kit" which usually includes the necessary tilt-head bracket and extension poles. These bundles ensure you have everything required for the job without making multiple trips to different owners.
Communication with the owner is vital because concrete waits for no one. You should message the owner at least 48 hours before your scheduled pour to confirm their availability. It's a good idea to share your timeline so they understand that a 7:00 AM pickup is non-negotiable. If an owner takes more than six hours to reply to a basic question, they might not be the most reliable partner for a time-sensitive project. You need someone who understands that a delay in getting your concrete finishing tools could result in a ruined slab.
How to vet a listing
Clear descriptions of tool dimensions help you plan your movements around the site. You'll need to know if a float is 900mm or 1200mm wide to calculate your reach across the pour. Check the owner's response rate on their profile to avoid potential delays. You must also verify if the rental price includes the 1.8-meter extension handles. Some owners list these as separate items, which can add €5 or €10 to your expected cost.
Pickup and return logistics
You'll need a vehicle that can accommodate long equipment. Most professional concrete finishing tools come with handles that are 1.8 meters long or more. These poles don't always telescope or break down into smaller pieces. You'll likely need a van, a truck, or a car with a roof rack and secure straps to transport them safely. Plan to pick up the gear the evening before your project starts to avoid morning stress.
Clean the tools with a garden hose and a stiff brush immediately after use. Concrete becomes significantly harder to remove after just 60 minutes of sun exposure. You'll avoid extra cleaning fees by returning the equipment in the same condition you received it. Use a friendly tone in your messages to keep the interaction positive. Contractions like 'it's' or 'don't' help you sound like a helpful neighbor rather than a corporate entity. Good relationships with owners often lead to better deals on future rentals.
Get Your Concrete Project Moving Today
Concrete projects require specific gear to avoid cracks or uneven surfaces. You'll need a magnesium float for the initial pass and a steel trowel for that final, hard finish. New tools often cost hundreds of dollars, especially for professional brands like Marshalltown or Kraft. Most homeowners find that these items sit in the garage for years after just one use, which isn't a great return on investment.
You can save up to 70% of the retail price by looking for equipment in your own neighborhood. Life4Rent connects you with verified local owners who have the gear you need sitting idle. It's a practical way to access high-quality concrete finishing tools without the commitment of a permanent purchase. You get the job done right, and the owner makes a bit of extra cash from their investment. Local rentals also mean you don't have to worry about long-term storage in a crowded shed or basement.
Find concrete finishing tools for rent in your neighborhood
Your next patio or walkway will look much better with the right equipment in your hands.
Common Questions About Concrete Finishing
Can I finish concrete with a piece of wood instead of a float?
You can use a straight piece of 2x4 lumber for a rough, slip-resistant surface, but it won't provide the smooth look of professional concrete finishing tools. Wood pulls at the surface aggregate and leaves a grainy texture that's often better for outdoor ramps or basic sidewalks. If you want a flat, professional appearance, rent a magnesium float to open the pores and smooth the surface without snagging.
How long do I have to wait before I start using the edger?
You should wait until the bleed water has disappeared and the concrete can support the weight of the tool without sinking more than 3 millimeters. This usually happens between 30 and 90 minutes after you level the slab, depending on the temperature and humidity. Most rental users find that once the surface sheen dulls, it's the right moment to create those rounded edges.
What is the difference between a magnesium float and a steel trowel?
A magnesium float is used early in the process to level the surface and keep the pores open so water can escape. You switch to a steel trowel only after the concrete begins to harden to create a dense, smooth, and wear-resistant finish. Use the mag float first; if you use a steel trowel too early, you'll trap water inside and cause the surface to flake off later.
Do I need to buy my own handles for a rented bull float?
Most owners on P2P platforms include 2 or 3 snap-on handle sections with the bull float rental to cover a standard 4-meter reach. You should check the listing details or message the owner to confirm the total length of the poles provided. It's rare to need your own handles, but ensure the connection type matches if you plan to extend the reach beyond 6 meters.
What happens if the concrete dries too fast while I'm finishing?
The surface will crust and become impossible to smooth if the concrete sets too quickly due to wind or 30-degree heat. You can lightly mist the area with water to keep it workable, but adding too much water weakens the top layer by 20% or more. Many experienced renters keep a pump sprayer nearby to apply a finishing aid that prevents premature drying without compromising the mix.
How do I clean rented concrete tools properly?
You must wash every tool with clean water and a stiff brush before the concrete hardens on the metal. Owners expect tools to return in the same condition they were lent, so spend 10 minutes scrubbing the blades and handles immediately after use. If any residue dries, use a plastic scraper rather than a metal one to avoid scratching the magnesium or steel surfaces.
Is it better to rent a power trowel for a small patio?
Hand tools are more practical for any slab smaller than 10 square meters because a power trowel is heavy and difficult to maneuver in tight corners. You'll spend about 40 euros to rent a walk-behind unit, but the setup and cleaning time often outweigh the benefits for a simple backyard project. Stick to a bull float and hand trowels for residential paths or small seating areas.
What is bleed water and why is it important for tool timing?
Bleed water is the excess moisture that rises to the surface after you screed the wet concrete. You must wait for this water to evaporate or be reabsorbed before you use any concrete finishing tools for the final stages. If you work the surface while water is still visible, you'll mix that water back into the top layer, which reduces the durability of the finished slab.
Related guides on Life4Rent
Ready to rent instead of buy? See all tools & equipment available to rent on Life4Rent →
Life4Rent
Rent it. Earn from it. Own less, access more.
Browse peer-to-peer rentals near you, or list what you own and start earning — all protected by Life4Rent Protect.
About the author
Amsterdam, Netherlands
Joshua writes about the financial side of renting and earning on Life4Rent. His guides focus on helping people understand the real cost of ownership, calculate rental income potential, and make smarter decisions about buying versus renting. He previously wrote on household economics and personal budgeting for a pan-European finance publication.